
It may be easy for members already using BDD (behavior-driven-development) that encourages teams to use conversation and concrete examples to formalize a shared understanding of how the application should behave. I have included some basic concepts for people who are not yet familiar with this approach below to help them have an insight & a thought to automate their repetitive DAST scans if desired. Also, it is worth to take a look at some useful references that can guide to set up the framework & to understand the following steps in case of doubts.
Introduction to NodeJS:
NodeJS is an open source JavaScript runtime environment to execute JavaScript outside the browser. It is build on Chrome V8 JavaScript Engine.
Introduction to WebdriverIO:
WebdriverIO is an open source Automation testing utility for NodeJS which can automate both web and mobile applications. It is written in JavaScript and packaged as npm node-module.
Introduction to Cucumber BDD:
BDD stands for Behaviour Driven Development. BDD is the method of writing test requirements of an application in simple user understandable format thus specifying the behavior of the application.
Cucumber is a tool that supports BDD. Cucumber uses simple text written in Gherkins language to describe the behavior of the application
There are 2 main components of BDD:
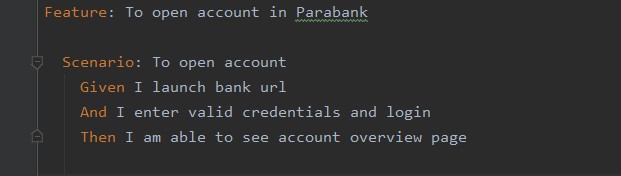
Feature File:
Feature files are the files to describe your test in Gherkins language. Gherkins language uses some keywords like Given, When, Then to describe your test. They are used as a entry point to your test.
Sample Feature File:
Step Definitions:
Step definition is the piece of code written for the steps mentioned in the feature file.
Sample Step Definition File for above feature file:

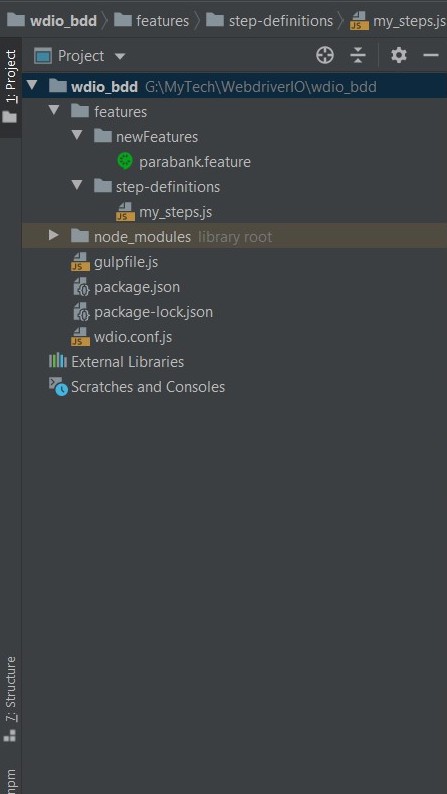
Folder structure after creating the framework:
Pre-requisites for setting up the framework
1. NodeJS installed in your system.
Follow the below link to download NodeJS
https://nodejs.org/en/download/
2. Any of the IDE for NodeJS
Some of the IDE’s are:
- VS Code
- Webstorm
- Atom
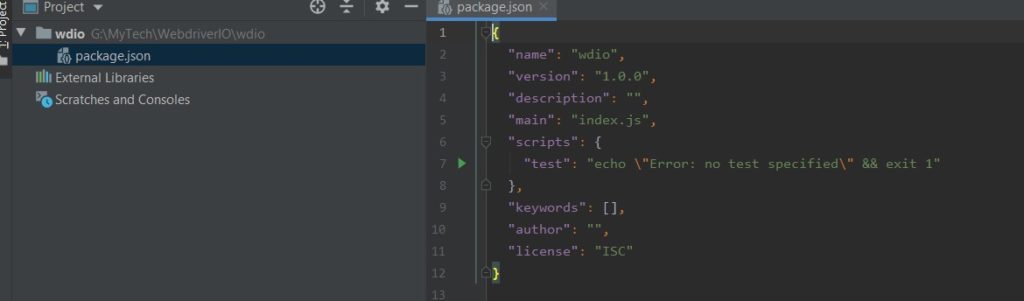
Package.json :
Package.json is the file which lists and maintains all the packages/dependencies(node modules) of your project. To install any package within your project, you should have package.json file within your project.
To create a package.json file:
Type following command in terminal within root of your project folder:
npm init
There will be a list of questions displayed on your terminal like package name, author etc. Answer these questions accordingly and you can see package.json file created within the root of your project
To create a default package.json file:
Type following command in terminal within root of your project folder:
npm init –y
By using above command, you can skip the questions and directly create a default file.
Installing basic packages/node_modules:
Node modules/Packages are the pre-defined written dependencies that you can directly install and use their functionality in your project.
Use below command to install a package :
npm install –save <package name>
Install below packages needed for webdriverio cucumber framework:
- npm install –save webdriverio@4.13.2
- npm install –save –dev selenium-standalone@6.15.3
- npm install –save cucumber
- npm install wdio-cucumber-framework
NOTE: Here we are using WebdriverIO v4 to create the framework
Creating wdio-configuration file:
You can create configuration file to take care of the configurations. wdio is the Test runner file for webdriverio. It can be used for multiple purposes like running multiple test cases, defining your target files, defining browsers and much more.
To create a wdio file:
- Type below command in your terminal:
\node_modules\.bin\wdio
- You will be asked to answer a few questions. Answer as below to create a cucumber framework:
- Where do you want to execute your tests? (Use arrow keys) — 1. On my local Machine
- Which framework do you want to use? (Use arrow keys) — cucumber
- Shall I install the framework adapter for you? (Y/n) — Y
- Where are your feature files located? (./features/**/*.feature) // just press enter if you do not want to change or you can change path as required
- Where are your step definitions located? (./features/step-definitions) // just press enter if you do not want to change or you can change path as required
- Which reporter do you want to use? (Press <space> to select, <a> to toggle all, <i> to inverse selection) — dot
- Do you want to add a service to your test setup? — selenium-standalone
- Level of logging verbosity (Use arrow keys) – silent
- In which directory should screenshots gets saved if a command fails? (./errorShots/)
- What is the base url? (http://localhost) —- <<Set your base url> or let it be localhost
- A file with name wdio.conf.js will be created in the root of your folder.
- You can open this file and change the name of browser and other things as required
Creating folders for feature file and step definitions:
Create folders/path for feature file and step definition as mentioned while creating wdio.conf.js file
Below are the paths mentioned within root of the project while creating conf. file
- Feature files: “./features/**/*.feature”
- features is the name of the folder. Your feature files will be created within it as .feature file.
- Step Defintions: “./features/step-definitions”
- Your step definitions will be created as .js file within above path.
Writing feature file and step definitions:
Create a feature file with extention .feature (ex: test.feature) within the feature file folder mentioned above. Create your steps within feature file.
Create Step definition javascript file within the path mentioned above for the same(ex: my_steps.js). Write your step definitions for the steps created in above feature file.
Installing and starting selenium-servers:
In order to run your test, you need to have selenium server running in your system.
To install servers:
.\node_modules\.bin\selenium-standalone install
To start the server:
.\node_modules\.bin\selenium-standalone start
Running your test:
Open package.json file and edit the test field as ‘wdio’
“scripts”: {
“test”: “wdio”
},
Run below command to run your test:
npm run test
Your test will be triggered and executed.
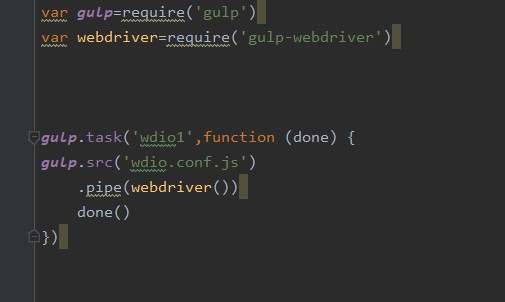
Running a test with gulpfile:
Gulp is command line task runner in node js. You can create a task within gulpfile or a sequence of tasks.
Below are the steps to run test via gulp file in WebdriverIO
- Install gulp node module globally and locally
To install locally: npm install -save gulp
To install globally: npm install -save gulp -g
- Create a file as gulpfile.js in the root of your project
- Import above installed packages in your gulpfile
- Create your gulp task as:
gulp.task(‘task name’, function(){
// Implementation of the task
});
You can give the task name as required.
Sample gulp task :
Integrating OWASP ZAP with BDD framework:
Pre-requisites:
- You need to have ZAP installed on your machine to run scans. To install ZAP, Java version 8 is required.
- In your configuration file within the framework, you need to configure the local proxy same as ZAP local proxy in order to intercept traffic from the regression pack / automated UI journeys & run passive/active scans.
To configure the framework with ZAP proxy, define the following local proxy connection steps inside capabilities in your configuration file. Note that it is an independent item & not within any subprocess
var proxy=localhost:8080 // assuming ZAP is listensing on the same port
proxy:{
httpProxy: proxy,
sslProxy: proxy,
proxyType: “MANUAL”,
autodetect: false },
3. You must import certificate from ZAP to intercept the SSL traffic. To import certificate from ZAP, go to Tools menu, options, Dynamic SSL certificates, generate & save the certificate & then install / import the certificate.
4. Incase if you require a outgoing proxy connection to connect to applications hosted externally from corporate network you need to set the outgoing proxy connection. From Tools menu option, goto options, Connection & check the box “use an outgoing proxy server” & supply relevant proxy info
After all the configurations are set, to verify if you are able to capture/intercept traffic from framework, launch ZAP & run a simple UI test case from the framework. If successful you can see the traffic under sites pane in ZAP which means you have successfully configured your framework with local proxy connection.
Now, we need to have the tasks prepared & align the flow to automate the DAST scans using ZAP.
- LaunchZAPUI.bat // in a windows machine, we can run this batch script to launch ZAP with timestamp as a parameter to ZAP session. It means every ZAP session activity can be accessed when required
- UIJourneys.bat // we can run & capture the UI journeys to map the application flows.
- ZAPnodescript.bat // we can run this to initiate ZAP tasks like setting a context, setting exclusions, run spider scans, run active scans etc., A spider can be used for comprehensive scans & not required for targetted scans
==> content of LaunchZAPUI.bat
SET Timestamp= // set desired timestamp value
echo %Timestamp% // to verify
echo.
cd pathtoZAP-Installed-directory
java -jar zap-2.8.0.jar -newsession %Timestamp% // to launch zap with time stamped sessions. All session files can be accessed in session folder under user profiles.
incase if you want to use attack mode, use the following
java -jar zap-2.8.0.jar -config scanner.attackOnStart=true -config view.mode=attack -newsession %Timestamp% // in attack mode the inscope urls are scanned as soon as those are intercepted. This could be a best fit to run targeted scans.
==> UIJourneys.bat // invoke your UI journeys required to be scanned
==> ZAPnodescript.bat // use this batch file to invoke a node script that triggers ZAP tasks after the application flow is mapped
The below example piece of code is for setting the ZAP context.
let apikey = ‘zap-api-key-value’;
let contextName = ‘ZAP-Scope’;
let include_url_context = ‘http://TARGETDOMAIN.*’;
let target_domain = ‘http://TARGETDOMAIN’
let exclude_url1 = ‘exclsuion_url_ if_any’ //define more exclusions if required in individual params
let setContext = ‘http://localhost:8080/JSON/context/action/newContext/?zapapiformat=JSON&apikey=’+apikey+’&formmethod=GET&contextName=’+contextName;
let setContextCall = httpGet(setContext)
function httpGet(setContext) {
let result = request(‘GET’ , setContext);
console.log(result.body.toString());
}
Likewise you can set the required ZAP configurations & actions ( spider / active scan ) using ZAP API end points. To automate the tasks, create a gulp sequential task & run the gulp task itself.